The pursuit of peak performance and well-being has moved from elite athletic facilities into our homes. Once the domain of professional athletes, cold water immersion is now a widely accessible practice for enhancing recovery and mental clarity.
The Core Principles of Cold Water Immersion
Before exploring different setups, it is important to understand why cold water immersion works. The practice is not about enduring icy temperatures for as long as possible. Instead, the primary goal is to use cold water to trigger a cascade of beneficial physiological responses. The shock of the cold stimulates the body, leading to a release of norepinephrine, a hormone and neurotransmitter that can sharpen focus, elevate mood, and reduce inflammation. This is one of the core cold therapy benefits that users report.
Consistency is far more valuable than intensity. You do not need to sit in near-freezing water to see results. According to a comprehensive guide from wellness technology experts at Nomad Labs, the key is accumulating 11 minutes of exposure per week. This can be broken down into shorter, more manageable sessions of two to four minutes each. This research-backed guideline makes the practice feel much more approachable.
The therapeutic temperature range is also more achievable than many people think. Significant metabolic and mental health benefits are observed in water between 50-59°F (10-15°C). This temperature is cool enough to activate the desired responses without requiring expensive, high-powered chilling equipment. Understanding these foundational principles shows that an effective cold plunge routine is well within reach, regardless of your budget.
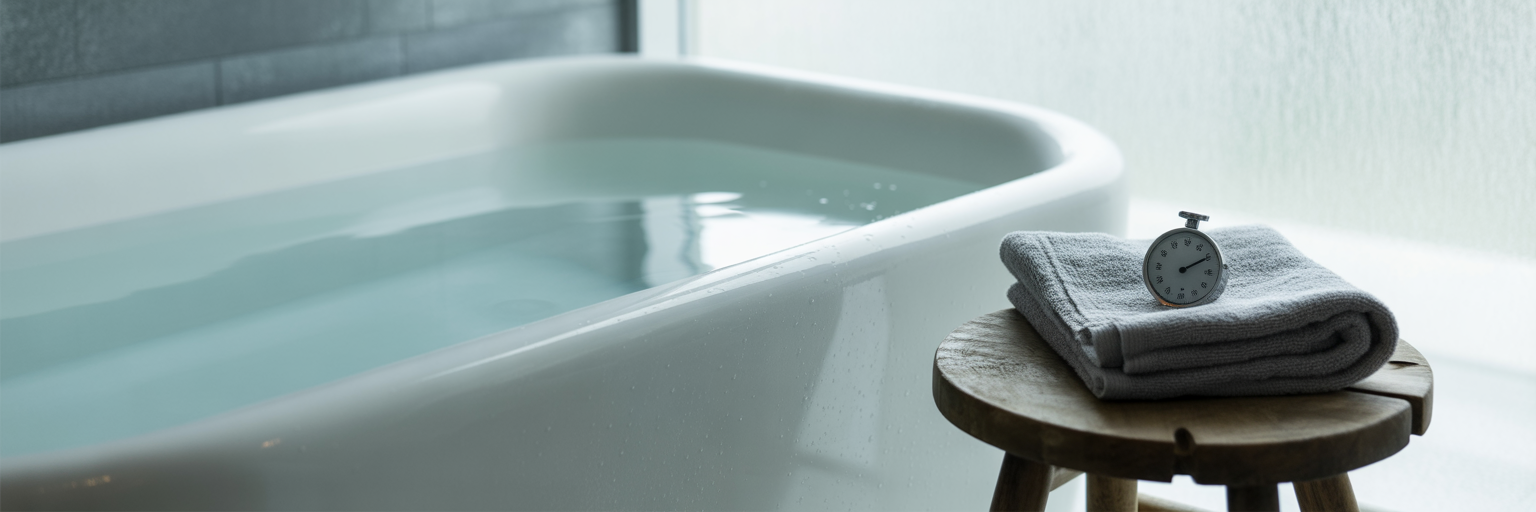
Starting with No Equipment Cost: The Bathtub Method
The most accessible entry point into cold water therapy requires nothing more than a standard bathtub. It is the ultimate affordable cold plunge, allowing you to experience the benefits without any initial investment. This method is perfect for anyone curious about the practice but not yet ready to commit to dedicated equipment.
Here is a simple, step-by-step guide to get started:
- Fill the Tub: Start by filling your bathtub with the coldest water from your tap. In many homes, this will get you close to the target temperature range, especially during cooler months.
- Measure the Temperature: Use a floating thermometer to get an accurate reading. This is a small but crucial investment to ensure you are in the effective therapeutic zone.
- Add Ice: To lower the temperature further, you will need to add ice. A typical bathtub may require 20-40 pounds (9-18 kg) of ice to reach the 50-59°F range. This becomes your main recurring cost.
- Monitor and Adjust: Stir the water and wait a few minutes for the temperature to stabilise before getting in. Keep your sessions short, aiming for 2-5 minutes.
The primary advantage is obvious: there is no upfront cost. However, the trade-offs become apparent quickly. The daily hassle of buying, transporting, and loading bags of ice can be tedious. Temperature control is also a challenge, as the water will warm up during your session. Furthermore, using a shared family bathroom for daily plunges can create logistical friction. While the bathtub method is an excellent starting point, many users eventually seek a dedicated setup. You can explore a range of our purpose-built cold plunge tubs to find a model that fits your space and commitment level.
Mid-Range Solutions: Portable and Inflatable Tubs
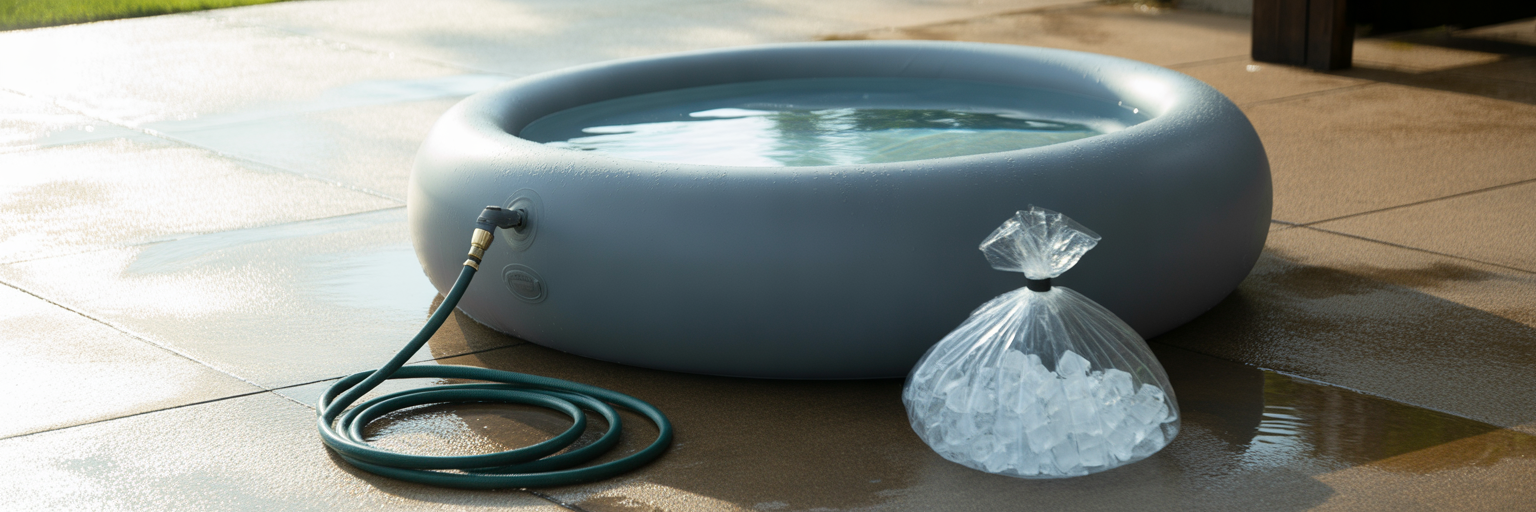
For those who find the bathtub method too cumbersome but are not ready for a permanent installation, portable and inflatable tubs offer a fantastic middle ground. These dedicated vessels, typically made from insulated PVC, represent a significant upgrade in convenience and efficiency. Their price generally ranges from $100 to $1,000, making them an accessible next step.
Compared to a standard bathtub, a portable tub’s main advantage is its dedicated purpose and insulation. The insulated walls help maintain cold temperatures for longer, which means you use less ice per session. This not only saves money over time but also reduces the daily effort required. Models like those from The Pod Company have become popular for their balance of affordability and thoughtful design. Their portability also means you can set them up in a garage, on a patio, or in a basement, freeing up the bathroom.
However, these solutions have limitations. You still need to manually fill and drain the tub, and the reliance on ice continues, albeit at a reduced rate. Durability can also be a concern compared to hard-sided units, as punctures are a possibility. When considering a purchase, look for:
- Material Thickness: A thicker, multi-layered PVC offers better durability and insulation.
- Insulation Quality: Check for features like an insulated lid, which dramatically reduces heat exchange.
- Included Accessories: Many come with a lid, a small pump for inflation, and a carrying case.
A portable tub is an excellent choice for anyone committed to cold plunging who wants a dedicated space without the cost and complexity of a fully automated system.
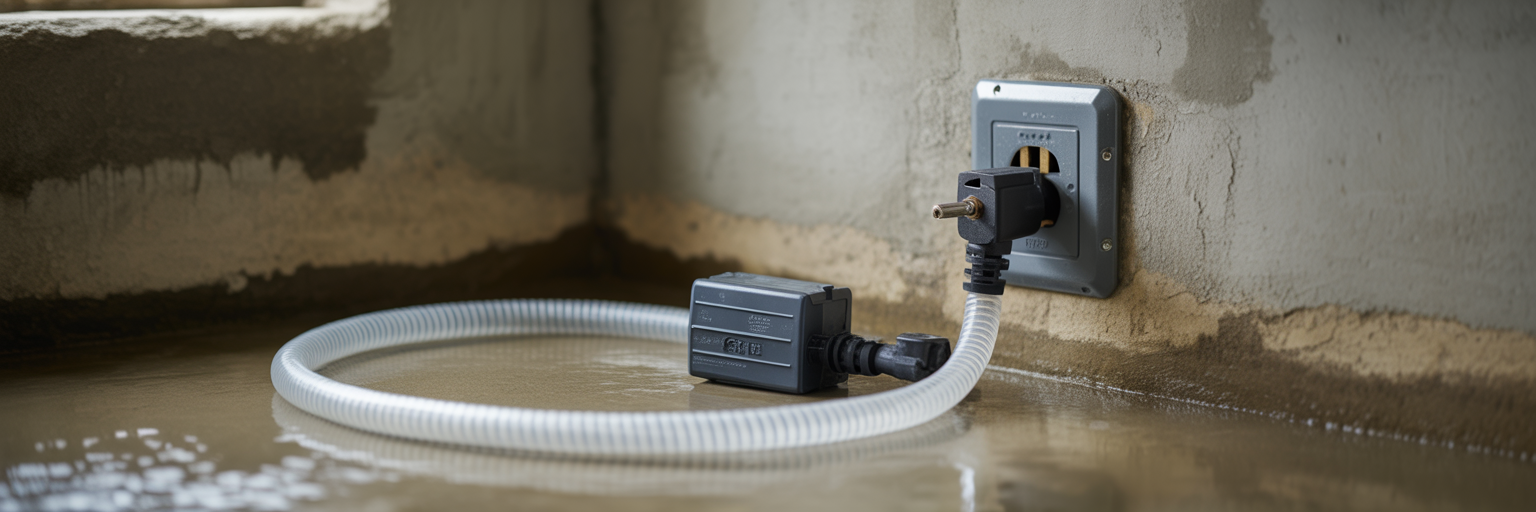
The DIY Approach: Building a Chest Freezer Plunge Tank
For the hands-on enthusiast seeking the best long-term value, converting a chest freezer into a cold plunge is the ultimate solution. This DIY cold plunge tub provides on-demand, temperature-controlled cold water at a fraction of the cost of a commercial-grade unit. The total investment for this project typically falls between $350 and $800, making it a highly cost-effective path to a premium experience.
The process of how to build a cold plunge from a freezer involves a few key components:
- Chest Freezer: A new or used freezer (7-15 cubic feet) serves as the insulated basin.
- Waterproof Sealant: Applying a marine-grade, waterproof sealant like Pond Shield to all internal seams is essential to prevent leaks and rust.
- External Temperature Controller: This device plugs into the wall and controls power to the freezer, allowing you to set and maintain a precise water temperature.
- Circulation and Filtration: A small submersible pump and filter keep the water clean and moving, preventing it from freezing solid and reducing how often you need to change it.
Safety is the absolute priority with this project. The freezer must be plugged into a GFCI-protected outlet to eliminate the risk of electric shock. Meticulous sealing is not just for waterproofing; it is a critical step to ensure the unit’s longevity and safe operation. While this approach requires some technical skill, the payoff is an always-ready, perfectly chilled plunge. Just as a DIY cold plunge offers precise temperature control, other technologies like PEMF therapy provide targeted recovery, though it is important to understand why PEMF feels invisible compared to the intense sensation of cold water.
| Factor | Bathtub Method | Portable/Inflatable Tub | DIY Chest Freezer |
|---|---|---|---|
| Initial Cost | $0 | $100 - $1,000 | $350 - $800 |
| Recurring Cost | High (Ice) | Medium (Ice) | Low (Electricity) |
| Temperature Control | Poor / Fluctuates | Fair / Manual | Excellent / Automated |
| Convenience | Low (Daily setup) | Medium (Manual fill/drain) | High (Always ready) |
| Effort Level | High | Medium | High (Initial build), Low (Daily use) |
This table summarizes the key trade-offs between the most common at-home cold plunge setups. Costs are estimates and can vary based on location and specific products chosen. The DIY approach offers the best long-term value and convenience but requires technical confidence for the initial build.
Practical Setup Considerations for Any Home
Regardless of which method you choose, several practical considerations will determine the success and sustainability of your at-home cold plunge routine. Thinking through these logistics beforehand can prevent common frustrations and ensure a safe, enjoyable experience.
First, consider the location. A basement with a concrete floor and a nearby drain is often ideal, as it can handle potential spills and makes water changes easier. Garages and covered patios are also popular choices. Placing a large, heavy tub of water on an upper floor requires careful consideration of the floor’s load-bearing capacity.
Next, address humidity and ventilation. A large body of cold water will condense moisture from the air, and a lid is essential to minimize this. In an enclosed space like a basement, this condensation can significantly raise indoor humidity, potentially leading to mould or mildew. Running a dehumidifier or ensuring adequate ventilation with an exhaust fan is a wise precaution to protect your home.
Water management is another key factor. How will you fill and drain your tub? A simple garden hose often works for filling, but draining can be more complex. A small submersible utility pump can make emptying the tub quick and easy, allowing you to direct the water to a drain or outdoors. Finally, thermal stability, achieved through good insulation and a quality lid, not only makes your sessions more effective but also reduces the energy or ice needed to maintain your target temperature. Properly planning your cold plunge space is just one part of creating a holistic recovery environment at home. For more ideas on integrating wellness technologies, our blog offers a wealth of information.
Best Practices for an Effective Cold Plunge Routine
Once your setup is ready, focusing on the practice itself is what delivers results. The goal is not to test your endurance but to create a consistent, beneficial habit. Remember the optimal protocol: aim for a total of 11 minutes per week, broken into shorter sessions of two to five minutes each. This approach makes the practice sustainable and highly effective.
One of the most important, and often counterintuitive, tips is what you do after your plunge. Resist the urge to jump into a hot shower immediately. By allowing your body to warm up naturally, you prolong the thermogenic response, maximizing the metabolic benefits of the cold exposure. Let your body shiver; it is a sign that your system is working to generate heat.
For strength athletes, timing is crucial. Some research suggests that cold immersion immediately after a resistance training session may slightly blunt the signals for muscle growth (hypertrophy). To be safe, consider waiting several hours after your workout or doing your plunge on rest days. While timing your cold plunge is key, you can also explore how other tools fit into your schedule, such as comparing the benefits of a cold plunge vs. red light therapy for different recovery goals.
Ultimately, listen to your body. Focus on your breath to calm your nervous system during the plunge, and never push through sharp pain. Consistency will always yield better results than intensity. For wellness practitioners or entrepreneurs inspired by these benefits, effectively sharing this knowledge is the next step. Understanding key digital marketing strategies to boost website traffic can help you reach a wider audience and build a community around recovery.